If you’ve encountered persistent issues such as system lag, software conflicts, or you’re merely looking to optimize your Windows 10 system for gaming, a clean boot can serve as a powerful tool in your troubleshooting arsenal. Contrary to a simple reboot, a clean boot allows your system to start with a minimal set of drivers and programs, facilitating a much more thorough diagnostic process. This comprehensive guide will delve deep into the step-by-step process of performing a clean boot, making it simple for even novice users to follow.
Why a Clean Boot?
A clean boot isn’t just a tool for technicians; it’s a multipurpose solution beneficial for any Windows user. If you’re investigating how to troubleshoot Windows 10 problems, how to fix a slow Windows 10 computer, or even how to optimize Windows 10 for gaming, a clean boot offers you an environment to isolate issues effectively.
Preparing for a Clean Boot: Preliminary Steps
Step 1: Administrative Access and System Restore Point
Before you initiate a clean boot, ensure you’re logged in as an administrator, as this procedure requires administrative privileges. It’s also a good idea to create a system restore point for added safety. Creating a restore point will be beneficial when you explore options like how to restore or reinstall Windows 10 later.
Here’s how to set a restore point:
- Open the Start menu, type “Create a restore point,” and click on it.
- In the System Properties window, click the “Create” button under the “System Protection” tab.
- Name your restore point and click “Create.”
We also advise saving crucial files to an external hard drive, which is now an affordably priced option. Having this backup can be invaluable in the unfortunate event of complete data loss, a situation nobody wants to experience. Check out either the WD 1TB Elements drive available for only £49 or for those that need more storage space try the WD 2TB Elements drive at only £59 for double the storage!
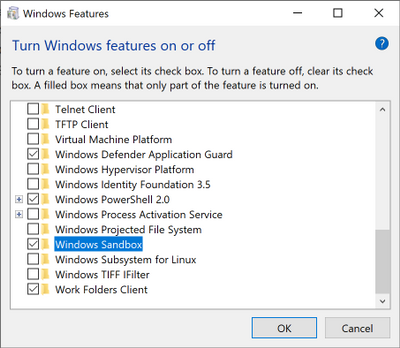
Step 2: System Configuration and Services Tab
- Open System Configuration by pressing Win + R, typing msconfig, and hitting Enter.
- Navigate to the “Services” tab. This area will serve as a launchpad for your clean boot and is particularly useful for advanced tasks like malware removal and system performance tweaks.
Step 3: Microsoft Services Isolation
Isolating Microsoft services from third-party services is crucial for a clean boot. This ensures that you disable only non-essential services while keeping critical Microsoft services running.
- Reopen the System Configuration window if you’ve closed it (Win + R, then type msconfig and hit Enter).
- Navigate to the “Services” tab.
- At the bottom of this window, you’ll find an option that says “Hide all Microsoft services.” Check this box.
- With Microsoft services hidden, the remaining services will be third-party. Click “Disable all” to deactivate these third-party services.
Step 4: Startup Programs and Task Manager
After disabling third-party services, the next focus should be on the startup programs. These are applications that automatically run when you boot up your system. They can significantly affect how to improve Windows 10 performance and also how to optimize Windows 10 for gaming.
- In the System Configuration window, navigate to the “Startup” tab.
- Click “Open Task Manager” to view the list of startup programs.
Step 4.1: Evaluating Startup Impact
In Task Manager, you’ll see a column labeled “Startup impact,” which shows how much each program affects the system’s boot time.
- Sort the programs by startup impact.
- Disable the ones you don’t need immediately at boot. Right-click on each program and choose “Disable.”
Note: Be cautious while disabling startup programs. Certain software, like antivirus programs, should generally not be disabled.
Step 5: Boot Options
For advanced users interested in tweaking their systems even further, additional boot options can be set within the “Boot” tab in System Configuration.
- Navigate to the “Boot” tab in the System Configuration window.
- Here, you’ll see options like “Safe boot,” which can be useful if you’re looking into how to remove malware from Windows 10.
Initiating the Clean Boot
Once you’ve configured your services and startup programs, you’re ready to initiate the clean boot.
- Close all open windows and applications.
- Click “Apply,” followed by “OK,” in the System Configuration window.
- A dialog will appear asking you to restart your computer to apply these changes. Click “Restart” to proceed.
Post-Clean Boot: Troubleshooting and Performance Checks
Your computer will restart in a clean boot environment. Now you can start the troubleshooting process for various issues.
Step 6: Isolate and Identify
- Start by checking if the issue you were experiencing is still present.
- If the issue is resolved, one of the third-party services or startup programs you disabled is the culprit. You’ll need to enable them one by one to identify which is causing the issue.
Step 7: Resource Monitor and Performance
- Press Win + R and type resmon to open the Resource Monitor.
- Here you can check CPU, Disk, Network, and Memory tabs to identify any resource hogging processes, particularly useful if you’re looking at how to improve Windows 10 performance or how to optimize Windows 10 for gaming.
Reverting Back to Normal State and Advanced Options
Once you’ve isolated the issues and are satisfied with the troubleshooting, it’s important to restore your system to its normal state. This is especially crucial if you’re planning to back up, restore, or reinstall Windows 10.
Step 8: Re-Enabling Services and Startup Programs
- Press Win + R to open the Run dialog, type msconfig, and hit Enter to open System Configuration again.
- Go to the “Services” tab and click “Enable All.”
- Switch to the “Startup” tab and click “Open Task Manager.”
- Re-enable the startup programs you had previously disabled by right-clicking and choosing “Enable.”
Step 9: Final Restart and Confirmation
After restoring the services and startup programs:
- Click “Apply” and then “OK” in the System Configuration window.
- You’ll be prompted to restart your computer. Confirm and proceed with the restart.
- Upon reboot, your system will be in its normal operational state.
Advanced Options: Exploring Beyond Clean Boot
Safe Mode
If a clean boot doesn’t resolve your issues, consider booting into Safe Mode, an environment even more stripped down than a clean boot. This can be useful for tasks like malware removal.
- Press Win + I to open Settings.
- Go to Update & Security > Recovery > Advanced startup.
- Click “Restart now” under Advanced startup.
- Upon restart, select Troubleshoot > Advanced Options > Startup Settings > Restart.
- After your computer restarts, press 4 to boot into Safe Mode.
System File Checker (SFC)
System File Checker is a built-in Windows utility that can scan and fix corrupted system files, aiding in tasks such as how to fix a slow Windows 10 computer.
- Open Command Prompt as an administrator.
- Type sfc /scannow and hit Enter.
Performance Monitoring and Diagnostics
For those interested in how to improve Windows 10 performance or optimize Windows 10 for gaming, the built-in Performance Monitor tool can provide detailed analytics.
- Open Run dialog (Win + R), type perfmon, and hit Enter.
- Explore the various metrics and reports to understand your system’s performance bottlenecks.
Conclusion: Empowering Your Windows 10 Experience
Performing a clean boot on Windows 10 can serve as a powerful tool for solving a myriad of problems. This guide provides a comprehensive look into the process and additional advanced options for seasoned users. From basic troubleshooting and malware removal to optimizing your system for high-performance tasks like gaming, a clean boot is an essential skill in your Windows 10 toolbox. Further resources and troubleshooting steps can be explored on Microsoft’s Support website.
While this article isn’t focused on comparing antivirus solutions, we believe it’s relevant to mention that, based on our experience, Bitdefender Total Security is a highly recommended option for maintaining a system that’s free of malware and viruses.
By following this guide, you’re not just troubleshooting; you’re taking a proactive step towards understanding your computer better, whether your aim is to optimize Windows 10 for gaming or to prepare your system for tasks like backup or a full Windows 10 reinstall.
And there you have it: a comprehensive guide on how to perform a clean boot in Windows 10, which also addresses multiple needs like troubleshooting, performance optimization, and more.